

Custom Signing Flow
Youtrust's API lets you sign a Signature Request without requiring Signers to use Youtrust's default signing flow, whether in the Embedded Signing or on the Youtrust platform. Instead, you build your own signing interface, matching your needs.
Why build your own signing flow
This approach is ideal if you want to:
- Create a fully customized signing experience.
- Interface with physical signature collection devices (e.g. a signature pad).
- Integrate the signing interface into a mobile or web application without embedding Youtrust's iframe or redirecting to the Youtrust platform.
When not to build one
Most Youtrust customers want a turnkey signing interface that is easy to integrate. If that is you, use the pre-built signing interface instead.
Build your own only if you have specific requirements the hosted interface cannot meet. In that case, you take full responsibility for:
- implementing the signing interface according to the mandatory steps below,
- proving that it is properly implemented,
- providing Youtrust with accurate information about the signing process and the Signers.
What are the conditions to build your own signing interface?
➡️ Before you start, make sure you understand the Signature Request concept, are familiar with the delivery_mode parameter, and have an active API trial or a Scale plan.
Before you choose it
Your Signature Request must meet every condition below to be signed without Youtrust's signing interface:
- The Signature Request
delivery_modemust be set tononeto prevent any email from being sent to the Signer. - All Signers of the Signature Request must have a
signature_levelset to Simple Electronic Signature (electronic_signature). - No Approver should be added to the Signature Request.
- The Signature Request must not have the parameter
signers_allowed_to_declineset to true - The Signature Request must not be linked to any Signer Document Request or Signer Consent Request
Signing interface mandatory steps
The signing interface you build must:
- Let Signers fully review the document before signing.
- When a Signature Request has multiple Signers, let each Signer see the signatures already applied.
- Collect the Signer's authentication before collecting their signature.
- Let Signers explicitly agree to sign.
- Let Signers download the signed document.
Step-by-step implementation guide
This guide walks you through integrating Youtrust's API into your own signing interface.
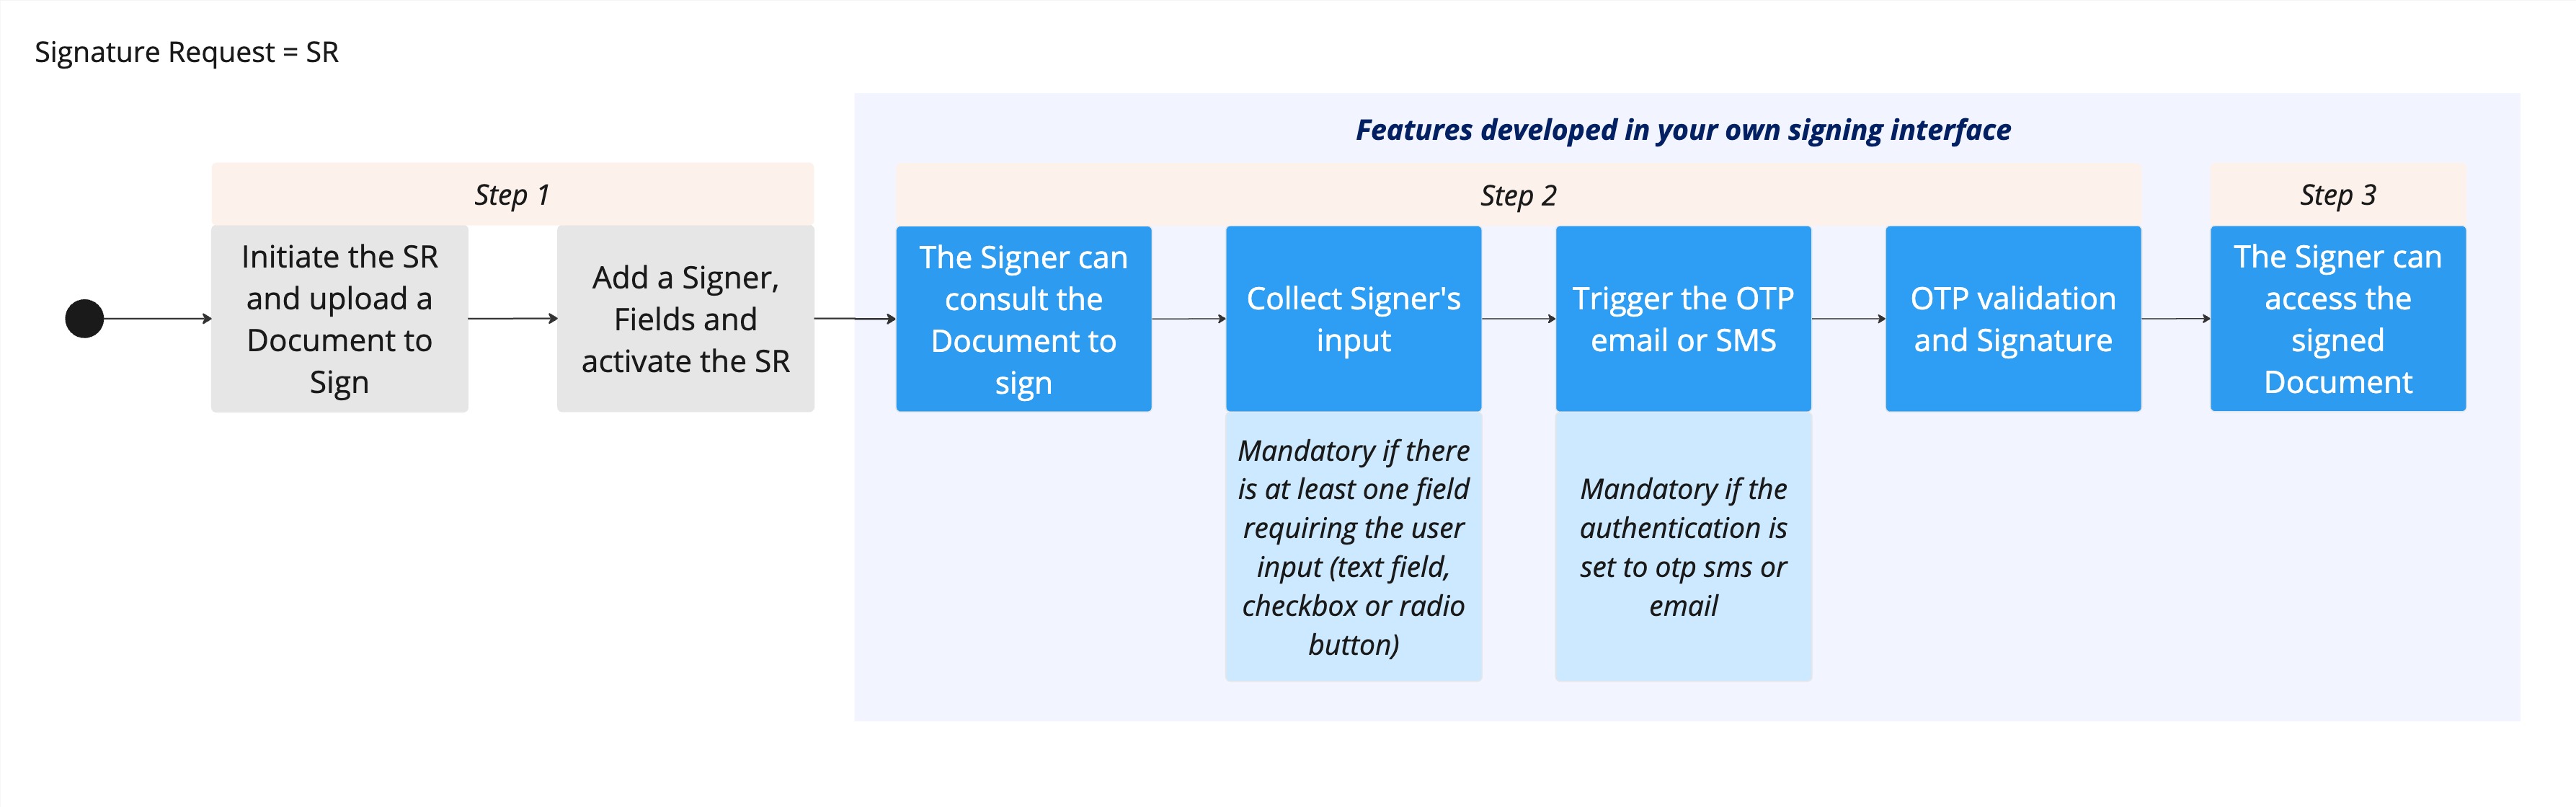
High-level diagram showing the interactions between Youtrust's API, your custom signing interface, and the Signer.
Step 1: Create and activate your Signature Request
Create your Signature Request following the Signature Request guide. It must meet the conditions listed above.
Step 2: Collect the Signer's input and signature through your custom signing interface
This step happens entirely on your side, in the signing interface you build. For this guide, assume a mobile application with:
- a step where the Signer views the document to sign,
- an optional step where the Signer fills in Fields that require their input (e.g. a Text Field),
- a step where the Signer receives an OTP by email,
- a step where the Signer enters the OTP and confirms they want to sign.
Step 2.1: Retrieve and update Fields requiring the Signer's input
If the Signature Request contains Fields requiring Signer input (e.g. Text Fields, Radio Groups, Checkboxes), retrieve them with this endpoint:
GET /signature_requests/{signatureRequestId}/documents/{documentId}/fields?signerId[eq]={signerId}
Then update them with the Signer's values using this endpoint:
POST /signature_requests/{signatureRequestId}/documents/{documentId}/fields/{fieldId}/answer
Populate every mandatory Field with a value before moving on to authentication and signature.
Step 2.2: Trigger the authentication email or SMS
If the Signer authenticates with otp_email or otp_sms, trigger the authentication email or SMS with this endpoint:
POST /signature_requests/{signatureRequestId}/signers/{signerId}/send_otp
The Signer receives the OTP by email or SMS, depending on the chosen setting.
Step 2.3: Submit the Signer's OTP and trigger the signature
Once the Signer has entered the OTP and confirmed they want to sign, send the signing command to Youtrust with this endpoint:
POST /signature_requests/{signatureRequestId}/signers/{signerId}/sign
This call must contain:
-
the Signer's OTP (if relevant in your context)
-
the Signer's IP Address (public IP address of the Signer at the time of signing, used for audit trail purposes)
-
the Signer's Signature time
-
the Signer's Signature image (optional)
Once Youtrust receives this call, it verifies the OTP. If valid, the document is signed.
Retry policy on OTP codes:
- After 5 attempts, the OTP is no longer valid and must be sent again.
- After 10 minutes, the OTP is no longer valid and must be sent again.
Step 3: Provide access to the signed document
After signing, Signers must be able to download their document through your custom signing interface. Download every Document of a Signature Request in one call, or download a single Document at a time.
Updated 2 months ago